
Here is a complete (or at least I hope) tutorial concerning the method to realise this "fire flower" cane out of fimo clay.

Here is the orange & black version of the same cane.
I am not very good at taking pictures (I mean pictures without cat ears or tails in the corners) as you probaly already noticed but I tried to do my best to illustrate the process.

We start with two color gradients, each of one made of three different colors. I chose these ones:

I realize color gradients with my pasta machine, flattening and folding the three colors together. I’ll try to write a short tutorial on gradients as soon as possible… Anyway here are the results:


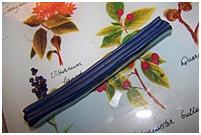
After reduction, our two gradients are identical cylinders.

We cut each of them into four identical parts. One of the parts will have to be cut in half once more. We now have five parts of the first gradient ("blue" one) and four parts of the second one ("yellow" one):

We now have to put the pieces back together (the two smallest parts go on the extremities):

Then we reduce, pressing the sides to obtain a cane this shape (this has a very strange appearance but don’t worry, that’s fine!):

We cut the cane into the number of petals we want (often 6 in my case) and give the pieces a “petal shape” by pinching their sides.Here we are :

lovely. thanks!
ReplyDeleteI'm glad you like it ;)
DeleteSo cool looking! I tried something like this in middle school and it was a huge failure. I didn't know to flatten it using a roller, though, so maybe I should try again!
ReplyDeleteYep, you should give it a new try, it is definitely a quite easy cane to realise :)
DeleteFantastic cane, very clever! did you cut it as is or did you fill between the petals with a different colour clay?
ReplyDeleteHi, so sorry I reply so late.....! I haven't been much around lately... I cut it as it is on the picture, filling the space between the petals with clay would have made cutting it easier but the final look is definitely not the same...
ReplyDeleteIt looks so fantastic! I love the red/black one. What kind of colours did you use for the black/red blend? Was it red/orange/black? I would like to try this one but not sure if it's right?
ReplyDeleteAdmiring the hard work you put into your blog and detailed information you offer.
ReplyDeleteIt's awesome to come across a blog every once in a while that isn't the same out of
date rehashed information. Fantastic read! I've
bookmarked your site and I'm adding your RSS feeds to my Google account.
Also visit my weblog จำนองบ้าน
I need to to thank you for this good read!! I definitely
ReplyDeleteenjoyed every bit of it. I've got you book-marked to check out new stuff you post…
Also visit my homepage - prada hats and scarves
Sorry my answer is soooo late :s If it's still of any use, I used black + brown + red for that part!
ReplyDeleteVery nice! Thank you for the tutorial!
ReplyDeleteRachel D